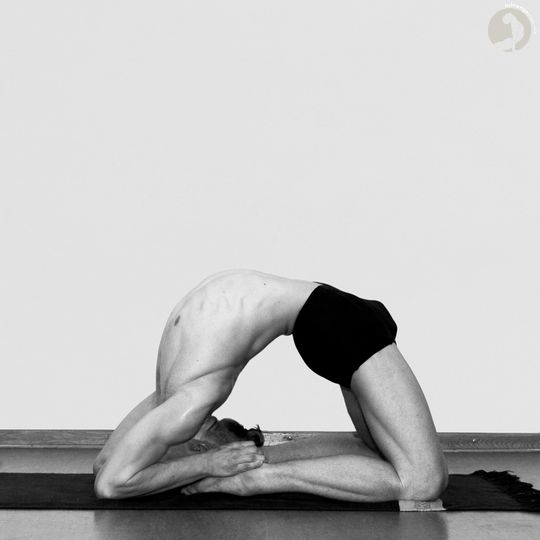
The Kapotasana or the pigeon pose is an ideal yoga for the joints and muscles in the leg. There are other benefits that can be derived from this yoga posture.
Table of Contents
Benefits of Kapotasana
- The pigeon pose stretches the joints and the muscles in the leg. It strengthens it too in the process.
- The back and hips are some of the key areas in the body which carry the load of the weight of the body. Kapotasana helps reduce stiffness.
- The pigeon pose is one of the ideal ways to balance the blood pressure. This also, in turns, has a positive effect on the reduction of the effect of chronic diseases.
- As with all yoga poses and postures, the Kapotasana eases the muscles, releases the stress, and calms the body and the mind.
Before you embark on this, there are certain precautions that you need to ensure.
Precautions
- It is beneficial to perform all yogic activities and postures with an empty stomach. The Kapotasana is no different too. It needs to be performed with an empty stomach too,
- Never over stress or stretch. It is not advisable to go beyond one’s capabilities. There might be injuries which will have an adverse effect on the body.
- There are other forms of Kapotasana. Always begin with the basic and then move to the more advanced ones, only after you have mastered the first stage.
- Although there are some other forms of Kapotasana too but my advice for you would be, to begin with basic posture and once you have mastered the basic posture, move onto the advance variations.
Steps to do Kapotasana Asana
Step 1
Begin in the Ustrasana position. Inhale while you lift your lower belly in and up while moving your tailbone towards the floor to steady your lower back. Then stretch your left arm towards the ceiling, rotating your left shoulder. Stay in this position for 5 breaths, exhale to release, then repeat on the other side before returning to the Ustrasana position.
Step 2
Now keeping the posture intact, stretch out both the hand, out in the direction you face is directing at. The idea is to engage the core. The arch that you have in the spine will further strengthen it as well as make is extremely flexible. Care should be taken about the limit till you can stretch.
Inhale slowly to lean back a little bit more, being led by the sternum.
Keep your head, which you moved backwards, still. Lift those shoulders up and squeeze those elbows.
Stay in this position for at least 5 breaths.
Step 3
While inhaling, reach your arms toward the floor. Press your feet on to the floor and, using the same support through the legs that you had cultivated while performingLaghuvajrasana, bend your knees till the palms of your hands reach the outside of each foot.
Again one should be mindful of one’s capabilities. This is a slightly difficult pose and should not be done if there is a sprain in the back. Keep checking the back all the while performing this pose.
This position may be referred to as Kapotasana B.
Step 4
Slowly move your hands towards your knees in a way your fingers align with your anklebones. Transfer some of your weight on to your left hand and slowly move your fingers of the right hand up to your right heel. After you grasp your right heel, grip it firmly. Then transfer your weight slightly into your right hand and use your right heel as the base to press upwards, walking your left fingers up to grip your left heel. Now, holding both your feet, and squeezing the elbows at each other, and push your hips in a forward movement while maintaining length and space in your lower back and keeping your core engaged and your tailbone moving towards your knees. While exhaling, bend your elbows and settle them towards the floor. Continue gently pulling forward without collapsing the hips or bringing the head to the ground.
Make an attempt to stay here for 5 breaths.
Now the time has come to exit from the posture. Move slowly and carefully. All the while Inhaling return to the Kapotasana B position and then bring your hands back to your hips, albeit slowly, keeping the thumbs on your sacrum.
And finally, roll the spine back up to the original position. So now you are standing erect on your knees.
Stay in this position and take 5 breaths.
Step 5
Slowly get back to the standing position.
I usually would advise my clients to not too much stress on the lumbar area, since that may lead to injury. However, if one is capable, then the Kapotasana posture is of great help.
As I had discussed at the beginning of the article that, this yoga posture will stretch muscles in the legs and the hips area. However, in addition to that, it is a great exercise for the core.
When one neds and creates the arch, the core is engaged.
Because of that the core muscles are not just made flexible but strong too.
However, this posture is an intermediate posture. Which is to say that someone who has been a practitioner of yoga, will find it easier. This is not for the beginners.
The Kapotasana posture for the beginners is simpler and requires less stress, though the hip and the flexor muscles will still get a rigorous workout.
That posture too is called the pigeon pose or Kapotasana.
Kapotasana has myriad variations. One for the beginners to the advanced practitioners.
The one for the beginners is described below:
- First place your Knee on the floor and keep your spine erect.
- Now slowly stretch your right leg in backward direction behind you.
- Extend the right leg till it reaches your left knee and the foot is adjacent to the right hip.
- Continue stretching your right leg till your left knee and foot are contiguous to the right hip
- Make sure that your toes are pointed.
- Now lean forward and inhale deeply.
- Now push your chest outwards.
- 20 -25 seconds is what you need to spend in this position.
- Now change positions.
- After that, sit in the Padmasana position and rest for a while and repeat the process for at least 4 times with both your legs.

